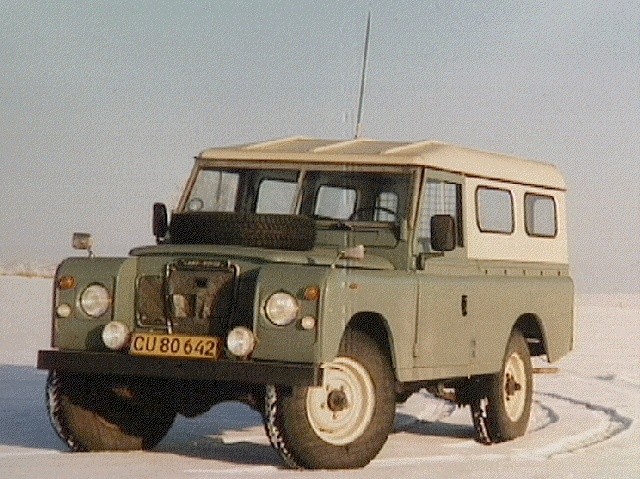
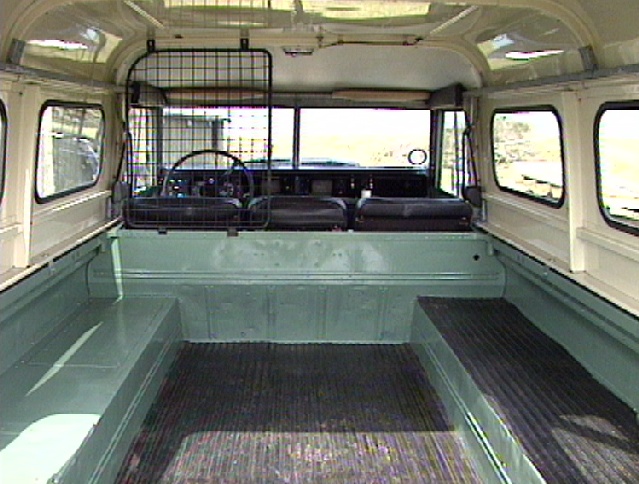
| When you first buy a Rover, you tend to
tread carefully, not daring to dismantle anything more than absolutely
necessary, just in case you can't put it together again. This means that
it can take many years to find your way around a land Rover, dismantling
more with each repair job, as you become more confident - or foolhardy.
 My
109" from 1976 has had several major rebuilds, but never the total stripdown
- until this year. I intended to service the front axle, and maybe give
the bodywork a lick of paint. But shipfitters disease set in, and over
a few days i discovered that I'd uncovered most of the chassis. I found
a few rust spots, and I was considering metalising the chassis anyway -
but this requires agressive sand-blasting, which i was afraid would reveal
even more rusty patches. But it seems a pity to just cover it up with paint
again, because stripping the body is half the job. I then discovered that
due to the vehicles age, i would not have to pay much - if any - registration
tax on fitting a new frame, and a new frame could be galvanised. My
109" from 1976 has had several major rebuilds, but never the total stripdown
- until this year. I intended to service the front axle, and maybe give
the bodywork a lick of paint. But shipfitters disease set in, and over
a few days i discovered that I'd uncovered most of the chassis. I found
a few rust spots, and I was considering metalising the chassis anyway -
but this requires agressive sand-blasting, which i was afraid would reveal
even more rusty patches. But it seems a pity to just cover it up with paint
again, because stripping the body is half the job. I then discovered that
due to the vehicles age, i would not have to pay much - if any - registration
tax on fitting a new frame, and a new frame could be galvanised.
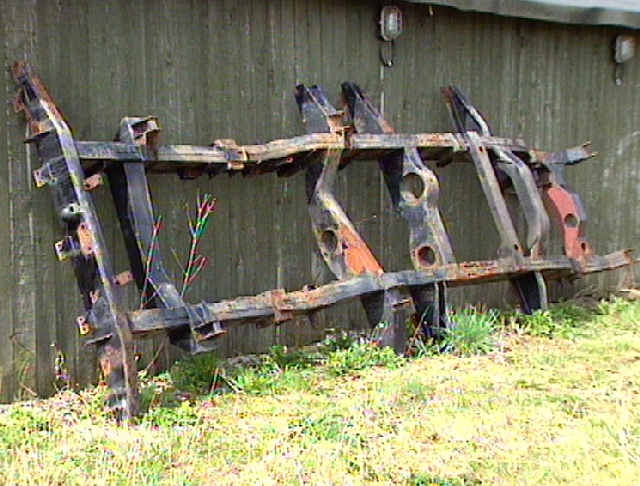
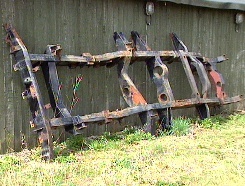 Here's
the old frame - now standing up against the wall. The paint is five years
old, with no underseal - most of the rusty patches are surface rust, revealed
by my scraping and brushing. Apart from a few bad spots, it's in remarkable
condition. Here's
the old frame - now standing up against the wall. The paint is five years
old, with no underseal - most of the rusty patches are surface rust, revealed
by my scraping and brushing. Apart from a few bad spots, it's in remarkable
condition.
One of the drawbacks of being a professional
photographer, is that you don't get around to taking pictures until it's
too late. When the rebulid was almost complete, I took a tv-camera and
shot these stills.
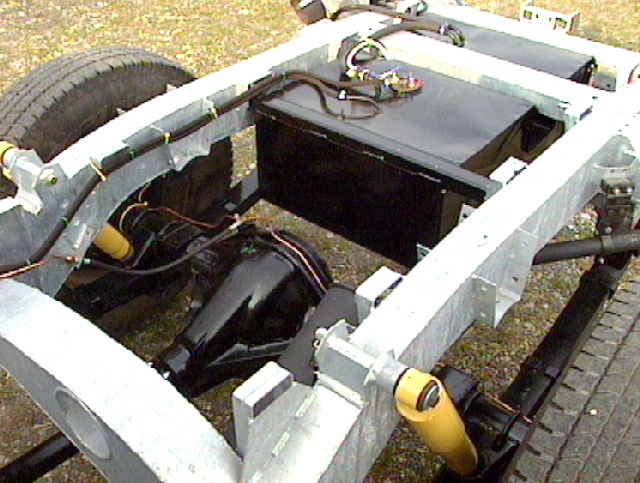
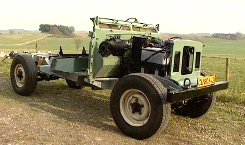 This
is the result of three months work - a naked rover, ready for brakes, steering
and engine alignment - much easier for the workshop to do before the bodywork
gets put on. All parts, including the dashboard and engine compartment,
have been take off, stripped to bare metal, and painted with 2 coats rust
paint and 2 coats black enamel. A new firewall has been fitted. The firewall
and other steel parts have been metalised to prevent rust. I don't use
underseal, nor do I intend to paint the chassis, but I will treat the inside
of the box frame chassis with tectyl or waxoyl. This
is the result of three months work - a naked rover, ready for brakes, steering
and engine alignment - much easier for the workshop to do before the bodywork
gets put on. All parts, including the dashboard and engine compartment,
have been take off, stripped to bare metal, and painted with 2 coats rust
paint and 2 coats black enamel. A new firewall has been fitted. The firewall
and other steel parts have been metalised to prevent rust. I don't use
underseal, nor do I intend to paint the chassis, but I will treat the inside
of the box frame chassis with tectyl or waxoyl.
 This
is how I like to see a Land Rover! Of course they get dirty, but a regular
wash with a high pressure jet helps. Maintaining a vehicle underneath is
much easier - and cleaner work - if you don't have to fight underseal.
Underseal is great on a new vehicle - for the first owner! But it can hide
a multitude of sins - rust can develop behind it, and it's difficult to
see until it's developed as a real problem. Underseal is also a problem
if you have to weld, because it burns easily. I usually paint the chassis,
but as its galvanised, it is not necessary - or so my Land Rover collegues
on the internet tell me from their experience. The next few years will
tell... This
is how I like to see a Land Rover! Of course they get dirty, but a regular
wash with a high pressure jet helps. Maintaining a vehicle underneath is
much easier - and cleaner work - if you don't have to fight underseal.
Underseal is great on a new vehicle - for the first owner! But it can hide
a multitude of sins - rust can develop behind it, and it's difficult to
see until it's developed as a real problem. Underseal is also a problem
if you have to weld, because it burns easily. I usually paint the chassis,
but as its galvanised, it is not necessary - or so my Land Rover collegues
on the internet tell me from their experience. The next few years will
tell...
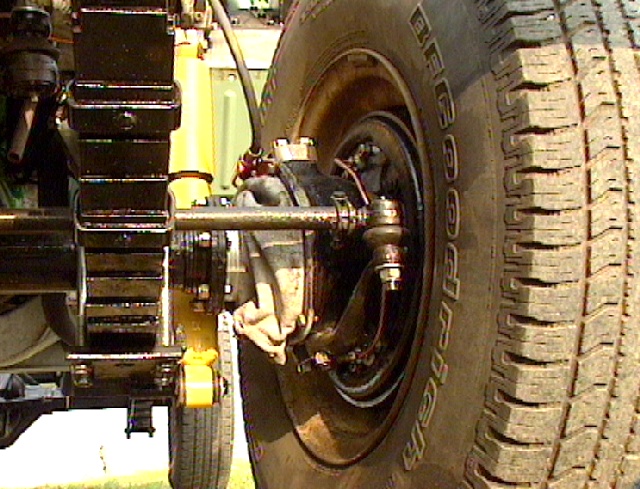
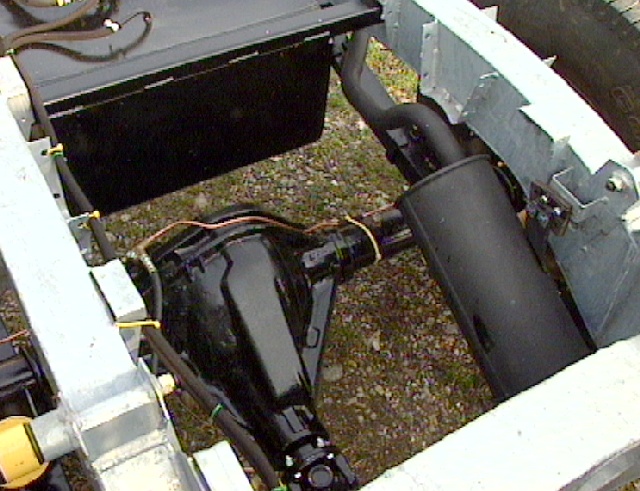
 Besides
the motor and gearbox, rebuilding the front axle is probably the most complicated
and time consuming job on a Series Land Rover. All bearings, oil seals
and gaskets have been replaced, and leather gaiters have been fitted over
the new swivel balls. All brake components have been replaced too. The
steering tracking rods have been metallised to prevent rust. It is important
to fit tie rod ends with grease nipples so that they may be lubricated.
The axial tracking rod inside the motor compartment, between the drop arm
of the steering bos and the steering relay in the front cross member, does
not have enough space to allow for grease nipples in the tie rod ends,
as these would foul the bodypanels. There is much discussion between Land
Rover enthusiasts as to whether one should use oil or grease in the swivel
balls. I use oil. Besides
the motor and gearbox, rebuilding the front axle is probably the most complicated
and time consuming job on a Series Land Rover. All bearings, oil seals
and gaskets have been replaced, and leather gaiters have been fitted over
the new swivel balls. All brake components have been replaced too. The
steering tracking rods have been metallised to prevent rust. It is important
to fit tie rod ends with grease nipples so that they may be lubricated.
The axial tracking rod inside the motor compartment, between the drop arm
of the steering bos and the steering relay in the front cross member, does
not have enough space to allow for grease nipples in the tie rod ends,
as these would foul the bodypanels. There is much discussion between Land
Rover enthusiasts as to whether one should use oil or grease in the swivel
balls. I use oil.
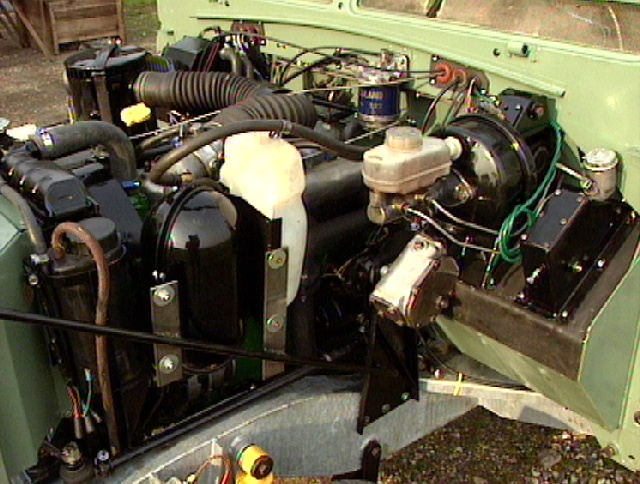
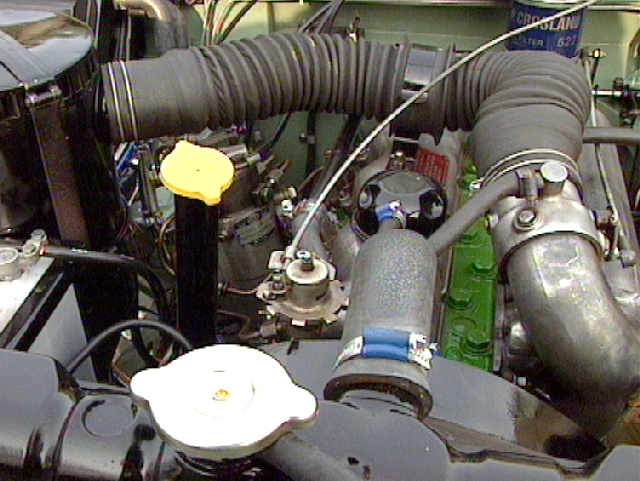
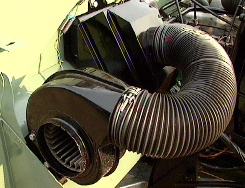
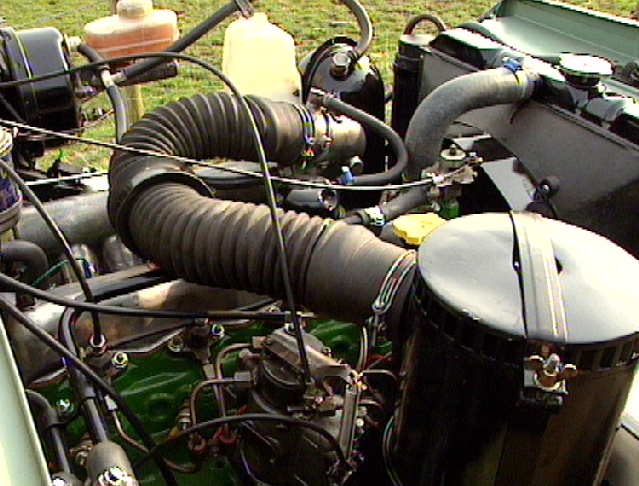
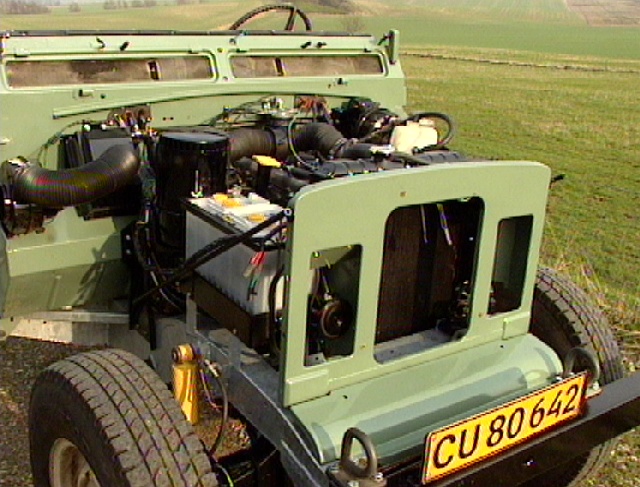
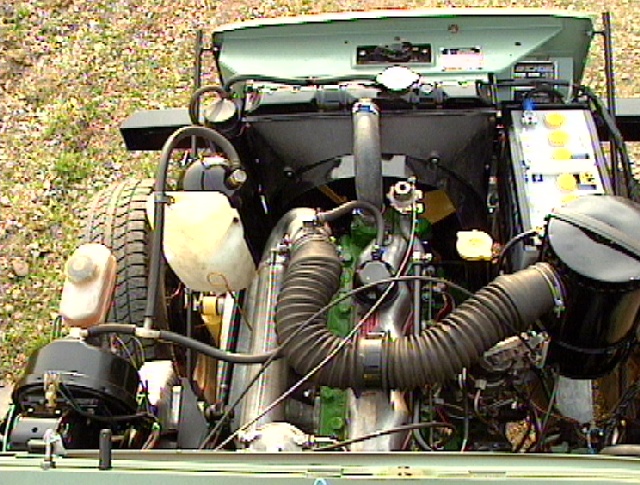
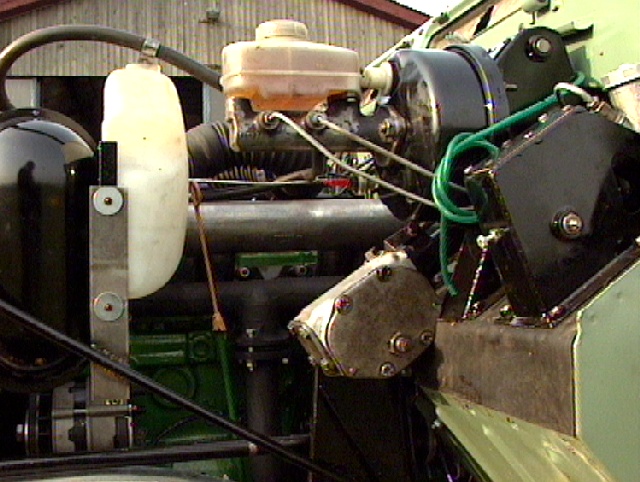
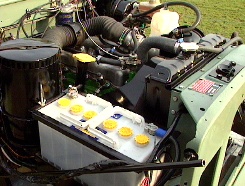 The
motor block was rebored and fitted with new pistons, valves, camshaft,
bearings and timing chain five years ago and is still in excellent running
order. On this rebuild I removed all external parts and each has been cleaned,
services, painted and reassembled. The motor block is painted with "John
Deere" tractor paint - bright green, which holds its colour and coating
well even on a hot motor. A clean and painted motor makes tracing oil leaks
easy work, and can be washed with soapy water. I have fitted a new 160A
Varta battery - my ideal choice for a battery which can start a diesel
in the cold winter months in Denmark. Here are some other shots of the
engine and front end of the vehicle. The
motor block was rebored and fitted with new pistons, valves, camshaft,
bearings and timing chain five years ago and is still in excellent running
order. On this rebuild I removed all external parts and each has been cleaned,
services, painted and reassembled. The motor block is painted with "John
Deere" tractor paint - bright green, which holds its colour and coating
well even on a hot motor. A clean and painted motor makes tracing oil leaks
easy work, and can be washed with soapy water. I have fitted a new 160A
Varta battery - my ideal choice for a battery which can start a diesel
in the cold winter months in Denmark. Here are some other shots of the
engine and front end of the vehicle.
In my experience, most faults on a Land
Rover are due to age - because the chassis, motor and drive chain last
so long, the vehicle becomes old enough for things which never fail on
other cars to wear out - loose fittings, loose electrical connections,
rusty joints - all of which get cured in a rebuild simply by being cleaned,
rebuilt or replaced. It is easy to strip a Land Rover, but important to
dissemble every part - the heater system and air vents being a typical
example. Clean them, rebuild them, and they will work like new for many
years.
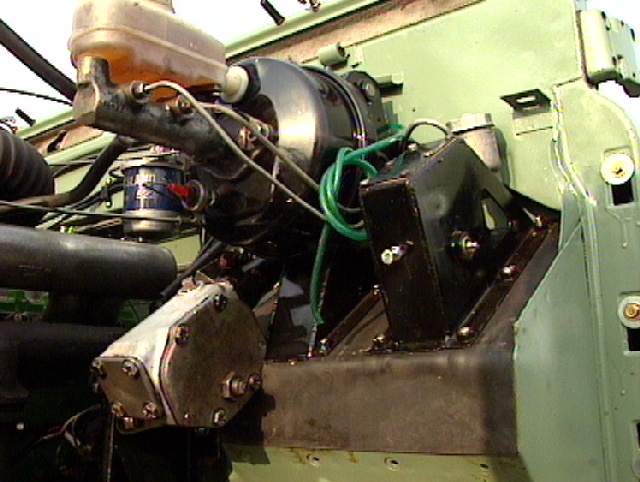
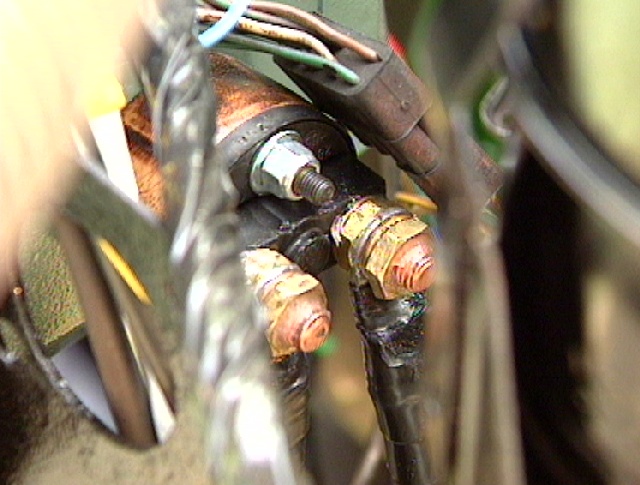
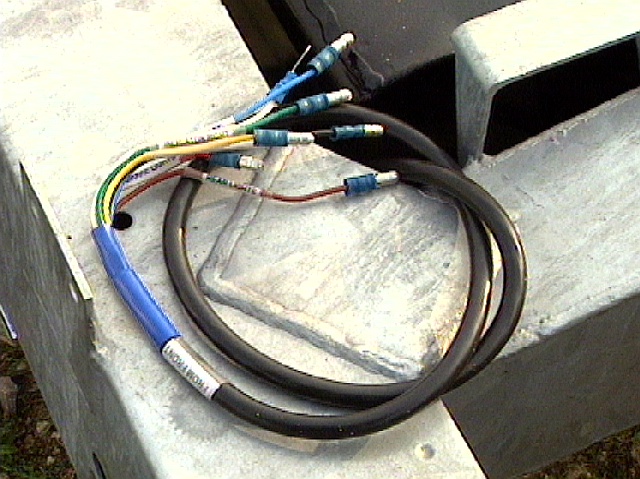
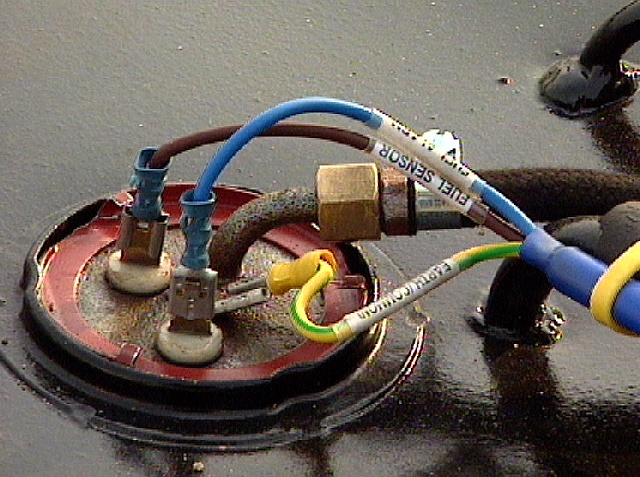
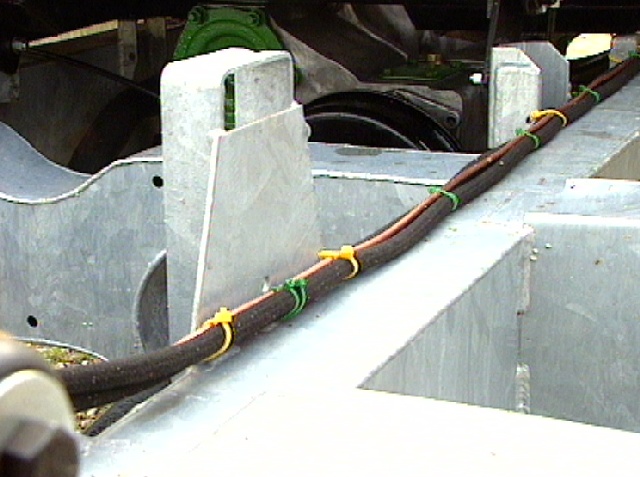
 I
have undertaken an number of modifcations, including fitting a master switch
between the 12 volt positive terminal of the battery and the starter motor.
This switch has a removeable key - besides being a useful anti-theft device,
it makes it easy to cut off all power on the vehicle in the event of electrical
failure or maintenance. This switch is mounted on the motor side of the
passenger side firewall. The wiring loom has been totally rebuilt using
original colour codes - except for the lines to the rear end, which have
been replaced with 7 core 1.5mm2 trailer cable. All cable ends have been
labelled with small printed labels which are covered with transparent heat
shrink sleeving. This makes future dismantling and fauilt tracing very
easy - especially on the rear lights and trailer socket which have to be
disconnected when the rear tub is removed. I
have undertaken an number of modifcations, including fitting a master switch
between the 12 volt positive terminal of the battery and the starter motor.
This switch has a removeable key - besides being a useful anti-theft device,
it makes it easy to cut off all power on the vehicle in the event of electrical
failure or maintenance. This switch is mounted on the motor side of the
passenger side firewall. The wiring loom has been totally rebuilt using
original colour codes - except for the lines to the rear end, which have
been replaced with 7 core 1.5mm2 trailer cable. All cable ends have been
labelled with small printed labels which are covered with transparent heat
shrink sleeving. This makes future dismantling and fauilt tracing very
easy - especially on the rear lights and trailer socket which have to be
disconnected when the rear tub is removed.
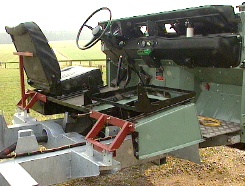 Working
on the brakes and steering is much easier when the body is removed, but
it is important to be able to sit in the driving seat. During a rebuild
it can be difficult to move the vehicle if there is no seat, and as the
seat console is supported by the rear tub, which is removed for painting,
I decided to build some temporary support brackets which can support the
seat console and drivers seat back. These will also fit my 88" chassis,
so they will come in handy. Working
on the brakes and steering is much easier when the body is removed, but
it is important to be able to sit in the driving seat. During a rebuild
it can be difficult to move the vehicle if there is no seat, and as the
seat console is supported by the rear tub, which is removed for painting,
I decided to build some temporary support brackets which can support the
seat console and drivers seat back. These will also fit my 88" chassis,
so they will come in handy.
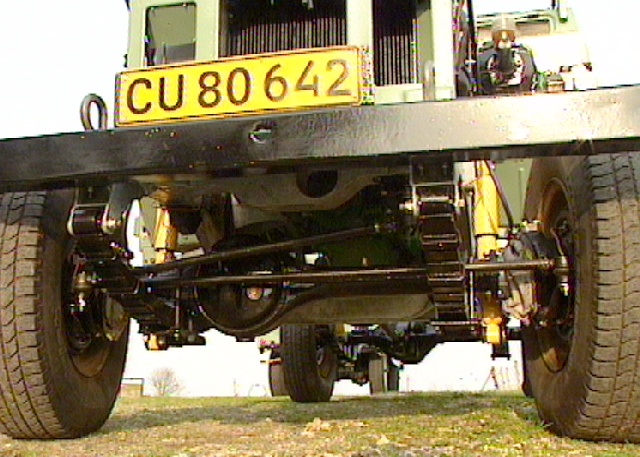
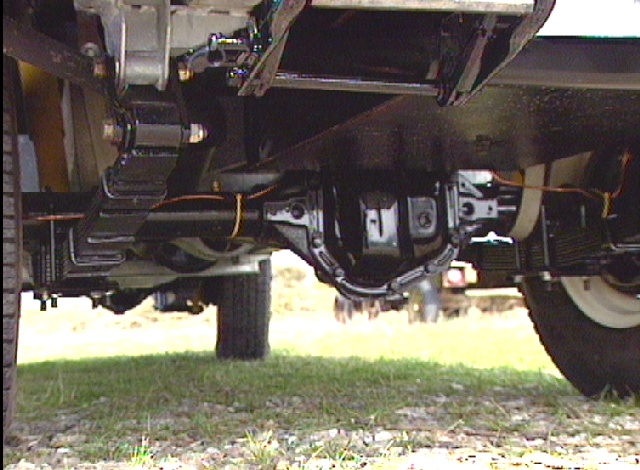
Here are some other views of the finished
rolling frame -
Practice makes perfect! I have had a lot
of practice, but I am far from perfect yet. I have mastered the art of
taking apart and rebuilding the mechanical parts, but the final finish
- especially painting the bodywork, is something which I am still working
hard to master. It gets easier with every rebuild. I have given up painting
the car as a finished unit - too much paint gets onto other parts, and
nooks and crannies, where rust or corrosion will later appear, do not get
coated by a cosmetic job. Each part is cleaned, sanded, washed, primed
with rust paint 8yes even the aluminium - red oxide is a much better primer
than the expensive primers, and it helps prevent galvanic corrosion too.
The on with the topcoat - British Leyland Motor Company colour 6412 Land
Rover light green, a single cover paint which is thinned with Xylene thinners
- you can spray on all you like until about an hour after the last coat
- then you must wait 6 weeks for the paint to cure before adding more,
it may just bubble. Plently of fresh air and daylight is the order of the
day, and breathing apparatus, safety clothing is essential. Do not try
to use auto paint unless you have studied the safety aspects, this stuff
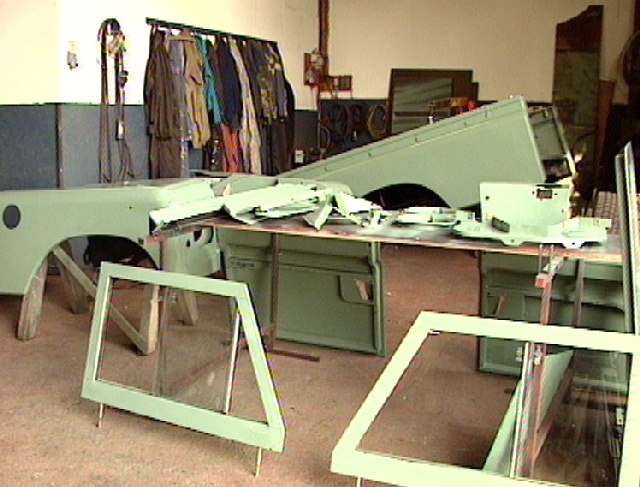
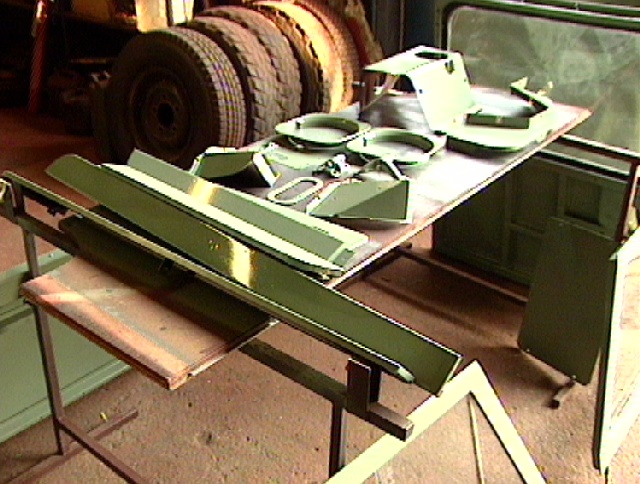
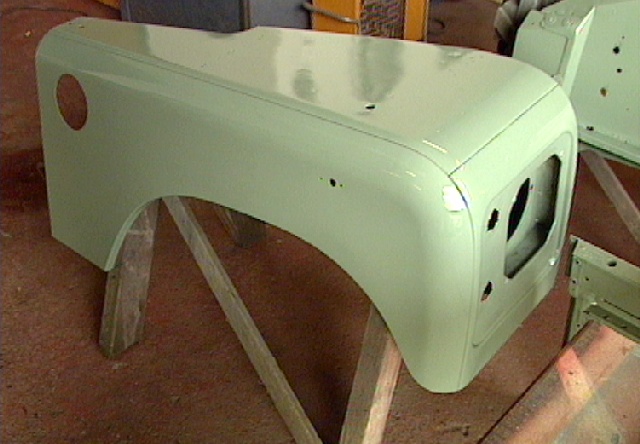
is potent to work with. Here's some shots of the body parts drying.
Of course the most satisfying process -
that which has kept me going for four months, is putting the vehcile back
together and seeing the finished result. In the space of a couple of days,
a workshop which resembles a battle-field becomes curiously empty, as all
the parts become a whole - leaving behind a pile of dirty tools, discarded
parts (many of which will be rebuilt and used on a future project) and
the usual bucket or two of rusty bolts and nuts. As a matter of principle,
I replace all nuts, bolts and washers every time I rebuild - with the exception
of special bolts on the engine for example. It makes for easy servicing
in the future, and the next rebuild in who knows how many years will go
smoother. All exposed bolt ends get a dab of silicone to prevent them getting
fould by crud and mud. I have gradually disposed of all non-standard fittings,
the entire vehicle is UNF unless the design dicates otherwise.
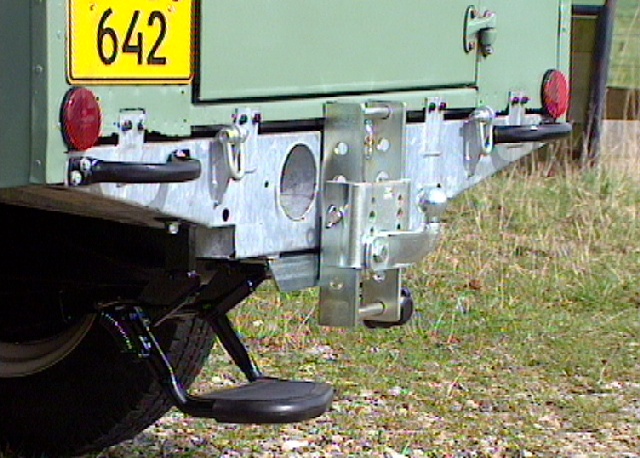
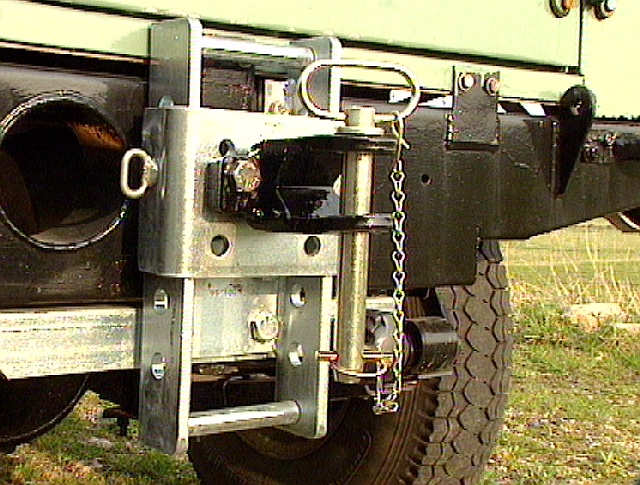
I use my Rovers for towing quite regularly,
often on borrowed trailers, so I have fitted the Dixon Bate adjustable
height tow hitch to all my series trucks. This allows a wide range of height
adjustment, plus the advantage that the hitch plate and hitch may be swapped
quickly for another type.
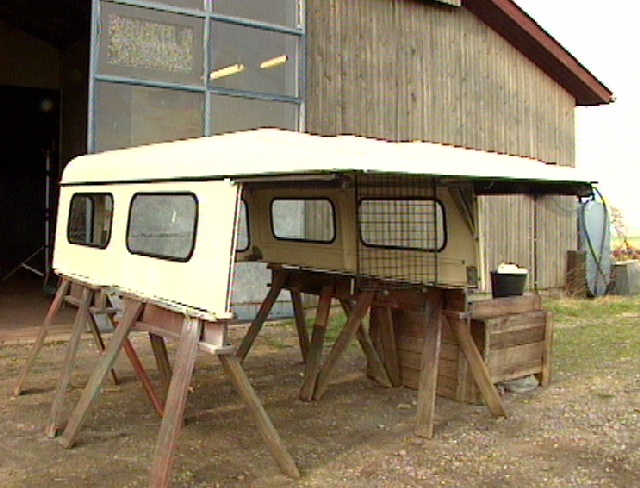
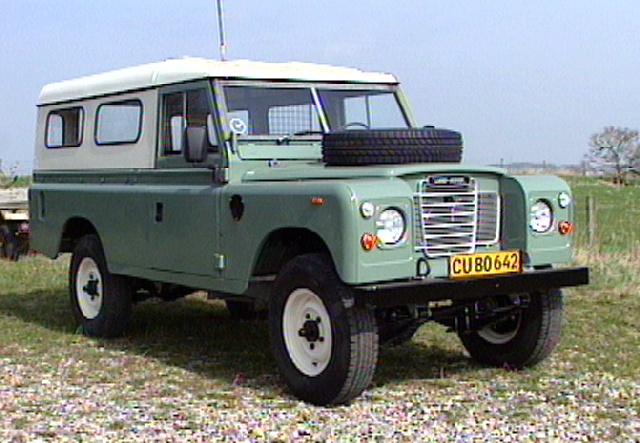
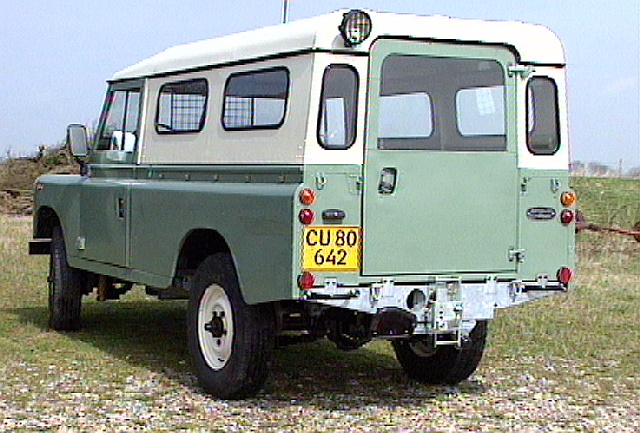
Here's some shots of the finished vehicle
-
This restoration has taken four months,
mostly evenings and weekends, and lots of nights. I don't pretend that
this is a totally original rebuild - many parts are new or aftermarket,
many small modifications to originality have been made, to suit the vehicle
to the needs of my work and my temperament. I have cut a few corners, but
the end result is a restoration which has brought new life to a trusted
friend which was already 22 years old. Barring accidents, I don't expect
to have to undertake major work on this Land Rover for many years. But
before embarking on a similar project yourself, be sure that it is what
you want - you get a nice shiny vehicle, but it's still a 1976 Rover with
the technology and quirks of vehicles of that vintage. It is still noisy,
and the 2.25 litre engine is more of a workhorse than a speed machine.
I like it that way, so I am not disappointed!
Restoration projects need a network of
human contacts who can help with parts, specialised service and advice.
As a starting pointI'd recommend subscribing to the Land
Rover Team Net on the internet - here you will meet people who have
done just the same with their trucks, and the chances are, that when you
run into problems, you will find someone who knows the answer pretty quick.
And they are a friendly bunch too!
Happy rovering!
Adrian Redmond
Channel 6 Television Denmark
e-mail landrover@channel6.dk |